LinkedBlockingDeque 是在JDK1.5时随着J.U.C包引入的,实现了 BlockingDueue 接口,底层基于双链表实现:

可以看到 LinkedBlockingDeque 是直接实现了 BlockingDeque 接口,而不是 BlockingQueue 接口。
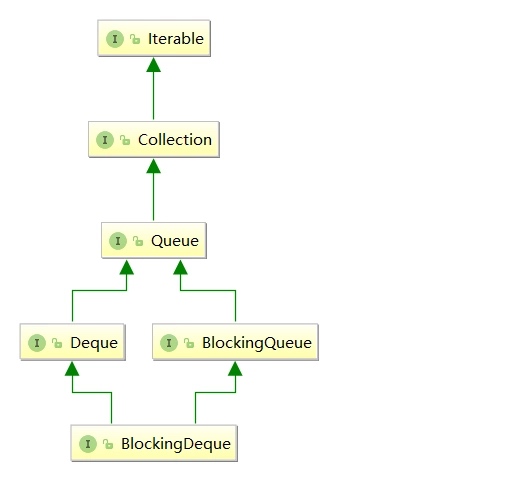
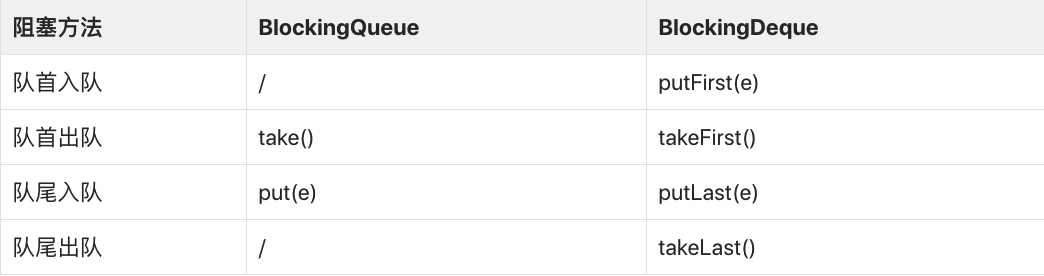
从上面的继承结构图可以看出,BlockingDeque 接口继承了 BlockingQueue 接口。而 BlockingDeque 相对于 BlockingQueue,最大的特点就是增加了在队首入队/队尾出队的阻塞方法。下面是两个接口的比较:
特性
LinkedBlockingDeque 在实现方法上与 LinkedBlockingQueue 高度类似,其在初始构造时就指定队列的容量,也可以不指定。如果不指定,那么它的容量大小默认为Integer.MAX_VALUE。LinkedBlockingDeque 具有如下特点:
- 1、底层使用双向链表实现。
- 2、只支持非公平策略,不支持公平策略。
- 3、使用 ReentrantLock 实现并发控制。
LinkedBlockingDeque 的特性与 LinkedBlockingQueue 相比,有如下几点不同:
- 第一,LinkedBlockingDeque 使用双向链表,而 LinkedBlockingQueue 使用单向链表。
- 第二,LinkedBlockingDeque 使用单锁实现并发控制,而 LinkedBlockingQueue 使用双锁实现并发控制。
原理
要了解 LinkedBlockingDequeue 是如何实现的,那么必须深入源码才行。下面我们将从类成员变量、构造方法、核心方法两个方面逐一介绍。
类成员变量
transient Node<E> first;

transient Node<E> last;

/** Number of items in the deque */
private transient int count;

/** Maximum number of items in the deque */
private final int capacity;

/** Main lock guarding all access */
final ReentrantLock lock = new ReentrantLock();

/** Condition for waiting takes */
private final Condition notEmpty = lock.newCondition();

/** Condition for waiting puts */
private final Condition notFull = lock.newCondition();

static final class Node<E> {
        E item;
        Node<E> prev;
        Node<E> next;
        Node(E x) {
            item = x;
        }
    }
从上面列出的类成员变量,我们可以得出几个显而易见的结论:
- LinkedBlockingDeque 使用双向链表实现。
- LinkedBlockingDeque 使用单锁双条件(lock)实现并发控制。
构造方法
了解构造方法是如何实现的,可以知道其实怎么初始化数据的,这对于后续的深入研究其实现有着非常重要的作用。对于 LinkedBlockingDeque 来说,其有三个构造方法:
/**
 * 默认构造器.
 */
public LinkedBlockingDeque() {
    this(Integer.MAX_VALUE);
}
/**
 * 指定容量的构造器.
 */
public LinkedBlockingDeque(int capacity) {
    if (capacity <= 0) throw new IllegalArgumentException();
    this.capacity = capacity;
}
/**
 * 从已有集合构造队列.
 */
public LinkedBlockingDeque(Collection<? extends E> c) {
    this(Integer.MAX_VALUE);
    final ReentrantLock lock = this.lock;
    lock.lock(); // Never contended, but necessary for visibility
    try {
        for (E e : c) {
            if (e == null)
                throw new NullPointerException();
            if (!linkLast(new Node<E>(e)))
                throw new IllegalStateException("Deque full");
        }
    } finally {
        lock.unlock();
    }
}
从上面的三个构造方法我们可以看出,LinkedBlockingDeque 并没有提供参数设置公平策略,所以其默认策略是非公平策略。 当 LinkedBlockingDeque 初始化完成之后,其数据结构为:

插入部分元素后的 LinkedBlockingDeque 结构:

如果你仔细对比过与 LinkedBlockingQueue 的区别之后,你会发现一个不同点:LinkedBlockingQueue 会初始化 head、last 节点,而 LinkedBlockingDeque 则不会。
// LinkedBlockingQueue 的构造方法
public LinkedBlockingQueue(int capacity) {
    if (capacity <= 0) throw new IllegalArgumentException();
    this.capacity = capacity;
    last = head = new Node<E>(null);
}
所以 LinkedBlockingQueue 会有一个哨兵节点,而 LinkedBlockingDeque 并没有。
核心方法
在之前讲解 BlockingQueue 的时候,我们说过阻塞队列最核心的就是那三对存取方法:
- add/remove
- offer/poll
- put/take
不同的阻塞队列可能会有所不同,但大致都类似。但对于 LinkedBlockingDeque 来说,因为其可以从另一端进行操作,所以其核心方法就多了一倍。
- addFirst/addLast/removeFirst/removeLast
- offerFirst/offerLast/pollFirst/pollLast
- putFirst/putLast/takeFirst/takeLast
但其实是实现逻辑都是类似的,只不过是操作逻辑反过来而已。在这里我们还是将分析下面几对核心方法:
- addLast/removeFirst 等同于 add/remove
- offerLast/pollFirst 等同于 offer/poll
- putLast/takeFirst 等同于 put/take
add/remove方法
我们先看看 add 方法的源码,可以看到其直接调用了 addLast 方法的实现。
public boolean add(E e) {
    addLast(e);
    return true;
}
我们继续看看 addLast 的实现逻辑。
public void addLast(E e) {
    if (!offerLast(e))
     throw new IllegalStateException("Deque full");
}
可以看到其直接调用了 offerLast 的实现。
public boolean offerLast(E e) {
    if (e == null) throw new NullPointerException();
    Node<E> node = new Node<E>(e);
    final ReentrantLock lock = this.lock;
    lock.lock();
    try {
        return linkLast(node);
    } finally {
        lock.unlock();
    }
}
在 offerLast 方法中,可以看到其首先获取锁,之后调用 linkLast 方法将其添加到链表尾部。
private boolean linkLast(Node<E> node) {
    // assert lock.isHeldByCurrentThread();
    if (count >= capacity)
        return false;
    Node<E> l = last;
    node.prev = l;
    last = node;
    if (first == null)
        first = node;
    else
        l.next = node;
    ++count;
    notEmpty.signal();  // 唤醒正在等待获取元素的线程
    return true;
}
可以看到在 linkLast 方法中,其进行了链表的维护,并且唤醒等待获取元素的线程。从 add 方法的逻辑我们可以看到,其真正的业务逻辑是在 offerLast 和 linkLast 方法中。
接下来我们看看 remove 方法的实现。
public E remove() {
    return removeFirst();
}
其直接调用 removeFirst 方法的实现。
public E removeFirst() {
    E x = pollFirst();
    if (x == null) throw new NoSuchElementException();
    return x;
}
可以看到其直接调用 pollFirst 方法的实现。
public E pollFirst() {
    final ReentrantLock lock = this.lock;
    lock.lock();
    try {
        return unlinkFirst();
    } finally {
        lock.unlock();
    }
}
可以看到其直接调用 unlinkFirst 方法的实现。
private E unlinkFirst() {
    // assert lock.isHeldByCurrentThread();
    Node<E> f = first;
    if (f == null)
        return null;
    Node<E> n = f.next;
    E item = f.item;
    f.item = null;
    f.next = f; // help GC
    first = n;
    if (n == null)
        last = null;
    else
        n.prev = null;
    --count;
    notFull.signal();
    return item;
}
在 unlinkFirst 方法中,其将链表第一个元素踢出链表,并且唤醒等待插入元素的线程(notFull)。
offer/poll方法
在 offer/poll 方法中,其直接调用了 offerLast 和 pollFirst 方法。
public boolean offer(E e) {
    return offerLast(e);
}
public E poll() {
    return pollFirst();
}
该方法我们在 add/remove 方法中已经讲解过,这里不再赘述。
put/take方法
我们先看看 put 方法的实现。
public void put(E e) throws InterruptedException {
    putLast(e);
}
可以看到其调用了 putLast 方法的实现。
public void putLast(E e) throws InterruptedException {
    if (e == null) throw new NullPointerException();
    Node<E> node = new Node<E>(e);
    final ReentrantLock lock = this.lock;
    lock.lock();
    try {
        while (!linkLast(node))
            notFull.await();
    } finally {
        lock.unlock();
    }
}
在 putLast 方法中,其首先获取了锁,之后调用 linkLast 方法将其放入链表尾部。
private boolean linkLast(Node<E> node) {
    // assert lock.isHeldByCurrentThread();
    if (count >= capacity)
        return false;
    Node<E> l = last;
    node.prev = l;  // ①
    last = node;   // ②
    if (first == null)
        first = node;
    else
        l.next = node;  // ③
    ++count;
    notEmpty.signal();
    return true;
}
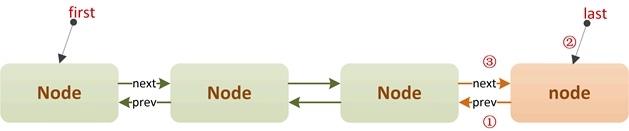
而 linkLast 方法我们之前也说过,其是将元素链接到链表尾部,并唤醒正在等待获取数据的线程。linkLast 方法的逻辑可以用下图来表示:
下面我们先看看 take 方法的实现。
public E take() throws InterruptedException {
    return takeFirst();
}
其直接调用了 takeFirst 的具体实现。
public E takeFirst() throws InterruptedException {
    final ReentrantLock lock = this.lock;
    lock.lock();
    try {
        E x;
        while ( (x = unlinkFirst()) == null)
            notEmpty.await();
        return x;
    } finally {
        lock.unlock();
    }
}
在 takeFirst 方法中,其首先获取了锁,之后再执行 unlinkFirst 方法。
private E unlinkFirst() {
    // assert lock.isHeldByCurrentThread();
    Node<E> f = first;
    if (f == null)
        return null;
    Node<E> n = f.next;
    E item = f.item;
    f.item = null;  // ①
    f.next = f; // help GC ②
    first = n;  // ③
    if (n == null)
        last = null;
    else
        n.prev = null;  // ④
    --count;
    notFull.signal();
    return item;
}
在 unlinkFirst 方法中,其将头部元素脱离链表,并唤醒正在等待插入的线程。unlinkFirst 的逻辑可以用下图来表示:

对比
与 LinkedBlockingQueue 相比,LinkedBlockingDeque 与其有下面几点不同:
- 第一,LinkedBlockingDeque 使用双向链表实现底层逻辑,而 LinkedBlockingQueue 使用单向链表实现。
- 第二,LinkedBlockingDeque 使用单锁实现,而 LinkedBlockingQueue 使用双锁实现。
- 第三,LinkedBlockingDeque 没有哨兵节点,而 LinkedBlockingQueue 有。
这里提出一个问题,既然 LinkedBlockingQueue 可以用双锁实现,那么 LinkedBlockingDeque 是否也可以使用双锁实现以提高并发性能呢?
有兴趣的朋友可以思考一下,也可以参考下面这篇文章:深入理解阻塞队列(四)——LinkedBlockingDeque源码分析
总结
LinkedBlockingDeque 在实现方法上与 LinkedBlockingQueue 非常相似,只不过 LinkedBlockingDeque 是双向链表,而 LinkedBlockingQueue 是单向链表。
而在 LinkedBlockingDeque 的核心实现上,基本上都是调用 offerFirst/offerLast/pollFirst/pollLast 进行锁获取,最终调用 linkFirst/linkLast/unlinkFirst/unlinkLast 进行链表维护。
最后,让我们用几个关键词概括 LinkedBlockingDeque:有界队列、双向链表、单锁实现。